Thursday, September 7, 2017

How to import export CSV files to Excel

If you use CSV files but want to edit them in Excel it's actually quite easy to import and export the format. Here's how to import/export CSV files to Excel.

Excel is able to handle a range of file types, including text documents such as TXT and CSV. In this feature we’ll take a look at how you can import or export the latter. The process is quite straightforward and only requires a copy of Microsoft Excel and an already created CSV file. We’ll be using Excel 2010 throughout this tutorial but the commands and procedures should be the same on newer, or indeed older, editions. 
How to import CSV files to Excel
Launch Excel then go to the File tab at the top of the screen, click it and then click Open from the menu that appears in the panel below.


Navigate to the folder that your CSV file is in and you’ll notice Excel isn’t able to find it. That’s because the Open menu automatically defaults to Excel file types (.xl, .xls, .ods, and a number of others) so we’ll need to change the setting. Just above the Open button at the bottom of the dialog box that’s on the screen you’ll see another box entitled All Excel Files. Click on this and then select Text Files from the long list that appears.


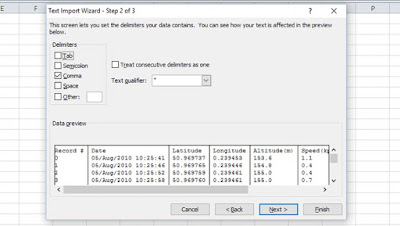
Now the CSV file should available. Double click on it and you’ll see the Text Import Wizard appear. The wizard should have determined that your data is Delimited. This means that fields are separated by commas. As CSV is an acronym for Comma Separated Value, this is correct. Double check that the Delimited option is chosen, then click Next.


The next page of the wizard concerns itself with how the data in the CSV file is separated, and therefore how information is displayed on the worksheet. The Delimiters section allows you to specify which character should be used as the sign for Excel to break up the text. You can toggle each one on and off and check the preview pane to see the effect this has on the data.


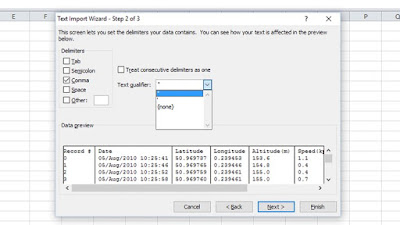
One other important option in this section is the Text Qualifier box. In here you’ll see the current character that indicates to Excel where a text entry begins and ends. For example if the Text qualifier is (“) then data reading “London, England” will be placed in a single cell. If any other character has been selected as the Text Qualifier, say (‘) then the same entry will be placed in two cells due to the comma between them which now acts as a separator.
This can all seem a little complicated, but so long as the data in the CSV file is consistent you shouldn’t have any need to adjust this setting, or if you do it should only be a matter of selecting the correct Text Qualifier.


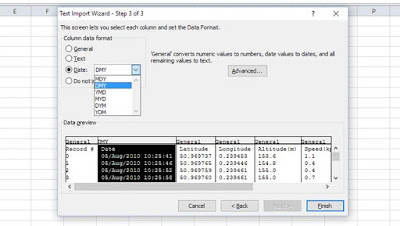
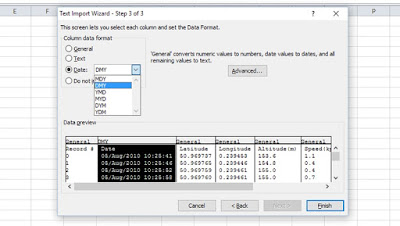
The last screen of the wizard asks you to set the format of data for each of the columns in the CSV file you’re importing. This will allow Excel to know exactly how to treat the figures and text in the file. This isn’t a universal setting as data in one column might be text while another could contain only numbers. To select the correct settings highlight each column by clicking on it in the Preview pane, then choose the data format from the four circular buttons above. Numeric fields should be General, while the others explain themselves.


The Date option also has a dropdown menu so you can select the relevant format – DMY, MDY, and so on. Clicking the advanced button will give you further control over how the numeric fields are displayed, should you require it.
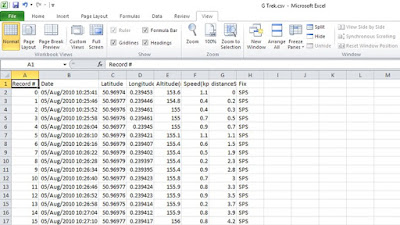
When you’re happy with the data format click Finish and your CSV file will be opened in an Excel worksheet. Cleverly it will remain in a CSV file format so you can save it and carry on using it with your text editor afterwards.


How to export CSV files in Excel
If you have another file currently in an Excel format but want to convert it to CSV, the steps are a bit simpler. Open the file then select the File tab at the top of the worksheet and double click on Save As. In the windows that appears you’ll see the current format displayed in the box beneath the file name. It should be Excel Workbook (*xlsx). Click this field to open the dropdown menu where you’ll find an option for CSV (Comma delimited) (*.csv). Select this and click Save.


If your workbook has multiple sheets you’ll see a warning box appear telling you that it can only save the active sheet (the one on top when you open the file) in CSV format. There’s no easy way around this except for the advice Microsoft gives, which is to save each sheet individually with a different name. If you have a multitude of sheets then maybe a CSV file isn’t the best choice as it could take a while to convert them.
On the other hand if the other sheets are empty (Excel does often create multiple ones in new documents) then right click each tab and select Delete until you’re left with the one you want. Repeat the Save process and you should now have a shiny new CSV file at your disposal.
Wednesday, September 6, 2017

How to use Microsoft Teams

Microsoft Teams is a very powerful chat-based workspace for Business or Enterprise editions customers of Microsoft Office 365. In our article we go through the basics of how to use it.

Microsoft Teams is the new kid on the block for chat-based workspace. The new tool in Office 365 Business and Enterprise allows users to chat, share files and collaborate together in a proficient manner. Here's how to use Microsoft Teams.

How to use Microsoft Teams: How to get Microsoft Teams

First and foremost you're going to need to activate Microsoft Teams. Within Office 365 portal head to the admin centre then look for Settings on the left-hand side, then go to Services & add-ins > Microsoft Teams, then toggle the option.
At the time of writing it's available in beta form in 181 countries and 18 languages. It will be ready for general release in Q1 2017. To use Microsoft Teams you must be a Business or Enterprise Office 365 customers - prices start from £3.10 a month. Therefore, you'll need to be a Business Essentials, Premium, or Enterprise E1, E3, or E5 customer to use Microsoft Teams.


You can use Microsoft Teams on Windows, Mac, iOS, Android and Windows Phone.
Important note: Anyone wanting to use the tool, will also have to have one of these editions of Office 365 - as non-business owners cannot use Microsoft Teams. Therefore, if you have a user with Office 365 Home, Personal or Student you won't be able to work with them in Teams (unless they upgrade of course).

How to use Microsoft Teams: How to create a team in Microsoft Teams

Microsoft has made it simple to create a team - you can do so in a few easy steps: Click on the Teams tab on the left-hand side and click on 'Create a team'.


From here you will be presented with option on who to invite to the team and a flurry of options to choose from to customise the team. Once created, members that were invited will be sent an invitation to join the team. If it's the first time using the tool, then you'll be prompted to create a team for your company.

How to use Microsoft Teams: How to manage members of a team in Microsoft Teams

Once you've got a team, you can press on the three dots by the team's name and you'll be presented with several options, a few of them being linked to member and team management.


You can add members, by selecting the option and entering your colleague's email address. To leave a team, you can select the option and you'll be prompted to confirm your removal from a team. If you have sufficient administrator powers, you can edit a team - including its members. Finally you can delete the team - but be wary if you delete, it will delete it for everyone inside it too - only owners of a team can do this.

How to use Microsoft Teams: How to add channels and connectors in Microsoft Teams

If you have sufficient administrator rights, you can add a channel. By doing so, your team will be presented with a new channel/option to chat - you can rename the channel and add connectors to it.


Connectors allow you to integrate various apps with Microsoft Teams - with the likes of Twitter, RSS, JIRA and Google Analytics to name just a few out of over 150 partners available to you.
Using these connectors, allows your team to use these plugins to access data or connect with other team members in a better fashion.

How to use Microsoft Teams: How to view your activity and notifications in Microsoft Teams

You can view your Activity and Notifications through the Activity tab - simply click on the Activity tab on the left-hand side to be presented with a list of notifications where you'll be able to see people who have mentioned you.
By clicking on the notifications or even recent conversations, you'll be taken directly to the thread where the relevant conversation has taken place. Also see: Best free email software

How to use Microsoft Teams: How to access and edit your files on Microsoft Teams

Clicking on the Files tab on the left-hand side, you will find all the files that have been shared with you - through this tab you can directly view and edit the files.

If you choose to edit your files, you will be able to do so in real-time with multiple different collaborators editing the file you're in - this is done through the integration of Office 365.

How to use Microsoft Teams: How to T-Bot in Microsoft Teams

T-Bot is a Microsoft bot designed to answer questions you might have on Microsoft Teams. To find T-Bot head into Chats on the left-hand side of Teams and fire your questions away. You will be presented with natural language replies, but it takes time for it to learn your tendencies.